Tutorials
🧰 Creating a Simple Box in OpenSCAD
This tutorial shows how to design a basic, parametric box using OpenSCAD. It's perfect for 3D printing or as a base for more complex designs.
🔄 Set Up Your Parameters
We define variables for the box's size and wall thickness so we can easily tweak it later:
w = 25;     // Outer width of the box
d = 15;     // Outer depth/length of the box
h = 10;     // Outer height of the box
wall = 2;   // Wall thickness
Statements must end with a ";" (semi-colon)
Create the outer shell
cube([width, length, height]);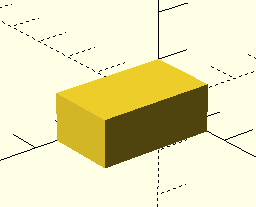
If all sides are the same you could do cube(size);
You don't need the brackets for a single value.
Hollow out the middle
difference(){
    cube([w, d, h]);
    translate([wall, wall, wall])
    cube([w-2*wall, d-2*wall, h]);
}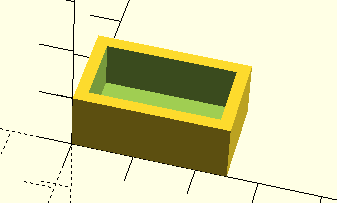
difference() removes the second object from the first.
translate() moves the second object to the specified coordinates.
The first cube is the outer shell, and the second cube is the hollow part.
Create a module
module box() {
    difference(){
        cube([w, d, h]);
        translate([wall, wall, wall])
        cube([w-2*wall, d-2*wall, h]);
}
}
module acts like creating a function.
You must call the module for it to run "box();".
You can also create and pass parameters to modules.
Create a lid
module lid() {
  cube([w, d, wall]);
  translate([wall, wall, wall])
  cube([w-2*wall, d-2*wall, wall]);
}
lid();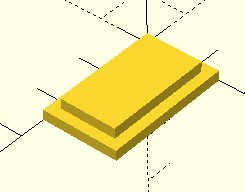
You can create a lid by using the same method as the box.
This is a cube on top of a cube.
The smaller cube fits inside the box. It will be a tight fit.
Final Code
// Simple Box Design
w       = 25;
d       = 15;
h       = 10;
wall    = 2;

// Design the box
module box() {
    difference(){
        cube([w, d, h]);
        translate([wall, wall, wall])
        cube([w-2*wall, d-2*wall, h]);
    }
}

// Design the lid
module lid() {
    cube([w, d, wall]);
    translate([wall, wall, wall])
    cube([w-2*wall, d-2*wall, wall]);
}

box(); // Call the box
translate([w+5, 0, 0]){ // move lid to side
lid(); } // Call the lid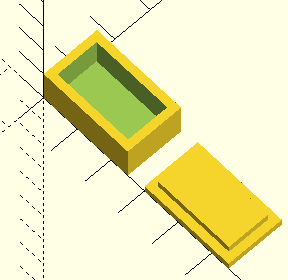
That's it! You've created a simple box in OpenSCAD. You can adjust the parameters to create different sizes and shapes.
Happy designing!
🌀 Creating a Rounded Box in OpenSCAD
This tutorial shows how to make a box with rounded corners using the offset() technique.
Step 1: Define the Rounded Rectangle
Create a 2D shape with rounded corners using a two-pass offset technique.
w = 60;
l = 40;
h = 20;
rad = 3;

module rounded_rect() {
    offset(r=rad)
    offset(delta=-rad)
    square([w, l]);
}
rounded_rect();
This technique, offset, expands the base shape, then contracts it to create filleted or rounded corners.
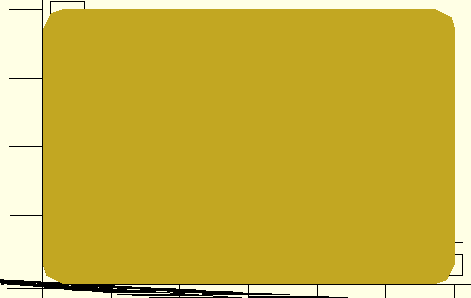
Step 2: Extrude to 3D
Now use linear_extrude() to give the shape depth and turn it into a 3D object:
linear_extrude(height=20)
rounded_rect();
This creates a box 60mm wide, 40mm deep, and 20mm tall, with 5mm corner radii.

Build the lid
Lid is very similar to the simple box.
// Lid top
module top_l() {
    linear_extrude(height = lid_thickness/2)
    offset(r=rad) offset(delta = -1*rad) square([w, l]);
    translate([w*.5, l, 0])
    cube([10, 2, lid_thickness/2]);
}
// Lid bottom
module bottom_l() {
    difference() { // hollow out the lid bottom
        linear_extrude(height = lid_thickness/2)
        offset(r=rad) offset(delta = -1* rad) // round the corners
      square([(w - (wall_thickness*2))- lid_clearance , (l - (wall_thickness*2))-lid_clearance ]);
        translate([wall_thickness, wall_thickness, 0])
        linear_extrude(height = (lid_thickness/2)+1)
        offset(r=rad) offset(delta = -1* rad) square([(w - (wall_thickness*4)) , (l - (wall_thickness*4))]);
    }
}

top_l();
translate([wall_thickness, wall_thickness, lid_thickness/2])
bottom_l();
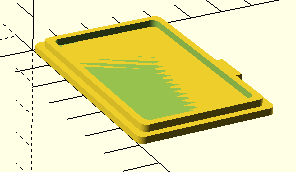
Final Code
Pulling it all together:
$fn = 100;
w = 60;
l = 40;
h = 20;
wall_thickness = 2;
lid_thickness = 4;
lid_clearance = 0;
rad = 2;

// Main box body
module outer_rec() {
    linear_extrude(height = h)
    offset(r=rad) offset(delta = -1*rad) square([w, l]);
}

module inner_rec() {
    linear_extrude(height = h)
    offset(r=rad) offset(delta = -1* rad) // round the corners
    square([w - (wall_thickness*2) , l - (wall_thickness*2) ]);
}
// Lid top
module top_l() {
    linear_extrude(height = lid_thickness/2)
    offset(r=rad) offset(delta = -1*rad) square([w, l]);
    translate([w*.5, l, 0])
    cube([10, 2, lid_thickness/2]);
}
// Lid bottom
module bottom_l() {
    difference() { // hollow out the lid bottom
        linear_extrude(height = lid_thickness/2)
        offset(r=rad) offset(delta = -1* rad) // round the corners
      square([(w - (wall_thickness*2))- lid_clearance , (l - (wall_thickness*2))-lid_clearance ]);
        translate([wall_thickness, wall_thickness, 0])
        linear_extrude(height = (lid_thickness/2)+1)
        offset(r=rad) offset(delta = -1* rad) square([(w - (wall_thickness*4)) , (l - (wall_thickness*4))]);
    }
}

// Hollow out the main box body
difference () {
outer_rec();
translate([wall_thickness,  wall_thickness, wall_thickness])
inner_rec();
}

// Create the lid and put it on the side
translate([w*1.1, 0, 0])
{
top_l();
translate([wall_thickness, wall_thickness, lid_thickness/2])
bottom_l();
}
This creates a taller box with a larger footprint and smoother corners.
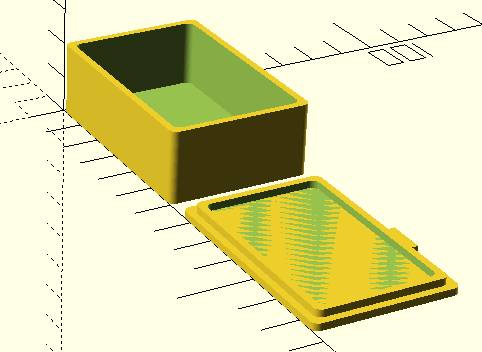
offset() method is lightweight and efficient—perfect for clean rounded edges without the complexity of minkowski().
That's it! You've created two types of boxes in OpenSCAD. Use these as foundations for more advanced models!
Happy designing!
🧪 [Tutorial Title Here]
[Short description about the tutorial’s purpose and outcome.]
Step 1: [Step Title]
[Description of the step goes here.]
// OpenSCAD example code
cube([20, 20, 10]);

Step 2: [Next Step Title]
[Continue building the model or explaining functionality.]
// More SCAD code
translate([5, 5, 0])
cylinder(h=10, r=4);

Raspberry Pi Colocation Setup:
Node.js Server with Nginx Reverse Proxy (Debian 12 Bookworm)
1. Initial OS Setup
- Install Raspberry Pi OS Lite (Debian 12 Bookworm) using Raspberry Pi Imager.
- Enable SSH and set a hostname during imaging.
- Boot and SSH into the Pi.
2. Disable Wi-Fi and Bluetooth
- Add text to the bottom of the file /boot/firmware/config.txt
- Reboot
sudo nano /boot/firmware/config.txt
  # Add at the bottom

  dtoverlay=disable-wifi
  dtoverlay=disable-bt

  sudo reboot
3. Update and Upgrade System
sudo apt update
  sudo apt upgrade -y
4. Install Node.js and NPM
curl -fsSL https://deb.nodesource.com/setup_22.x | sudo -E bash -
  sudo apt install -y nodejs

  node -v
  npm -v
5. Install Project Dependencies
cd ~/tronkits
  npm install dotenv
6. Install OpenSCAD (for STL generation)
sudo apt install -y openscad
7. Install and Configure PM2
sudo npm install -g pm2
  cd ~/tronkits
  pm2 start app.js --name tronkits
  pm2 save
  pm2 startup
8. Install and Configure Nginx Reverse Proxy
sudo apt install nginx -y
  sudo nano /etc/nginx/sites-available/default
Replace contents:
server {
      listen 80;
      server_name _;

      location / {
          proxy_pass http://localhost:8080;
          proxy_http_version 1.1;
          proxy_set_header Upgrade $http_upgrade;
          proxy_set_header Connection 'upgrade';
          proxy_set_header Host $host;
          proxy_cache_bypass $http_upgrade;
      }
  }
sudo systemctl restart nginx
9. Configure UFW Firewall
sudo apt install ufw
  sudo ufw allow 22/tcp
  sudo ufw allow 80/tcp
  sudo ufw allow 443/tcp
  sudo ufw limit 22/tcp
  sudo ufw logging on
  sudo ufw enable
  sudo ufw status verbose
10. Set Static IP for Colocation
sudo nano /etc/NetworkManager/conf.d/10-globally-managed-devices.conf
Add:
[keyfile]
  unmanaged-devices=none
sudo systemctl restart NetworkManager

  sudo nmcli con add type ethernet ifname eth0 con-name static-eth0 ipv4.method manual \
  ipv4.addresses 154.9.0.34/30 ipv4.gateway 154.9.0.33 ipv4.dns "8.8.8.8 1.1.1.1" ipv6.method ignore

  sudo nmcli con up static-eth0

  sudo nmcli con delete "Wired connection 1" # Optional
11. Final Pre-Ship Checklist
- Confirm system ready and all services running.
- Shutdown cleanly:
sudo shutdown now
Package your Pi securely for shipment!